
In the last blog, I have discussed the methods to backup and restore your PC without a pre-configured backup drive. Let us now see how to Configure Backup and Restore in Windows 10. We shall first discuss the methods to take various types of backup and process to restore them in case the system crashes. These methods are useful if you want to pre-configure the backup and restore the backup in case of system failure. You may take a backup of the complete OS, Files, Settings, applications, and drivers depending upon the type of backup you use.
For the recovery methods without backup, please refer to my last blog Backup and restore.
Different ways to Configure Backup and Restore in Windows 10
In this Advanced Backup and Restore options in Windows 10, we are going to discuss:
- System Image backup
- File History
- Create System Repair Disc
- Create a recovery drive
- Backup and restore utility
1. System Image Backup
System image backup contains all data of the PC at any particular instant. Suppose you create an image backup on a specific day, a complete image of the PC stored in the external drive. You will need one of the options among a pen drive of sufficient storage capacity, an external hard disk, multiple optical discs, or Network storage for the image backup.
The storage size varies according to the amount of data and the number of disk partitions to be backed up. However, you must include the system drive and the boot partition for the backup. The back up of the rest of the disk partitions is optional. If you have sufficient space, then you may keep the backup of all the drives of your PC. You can take multiple versions of image backup. Else, after taking a new image backup, you may delete the older to save disk space. You may copy and paste the backup folder to another media as well.
How to take system image backup?
First connect an external USB storage media for the backup in your PC.
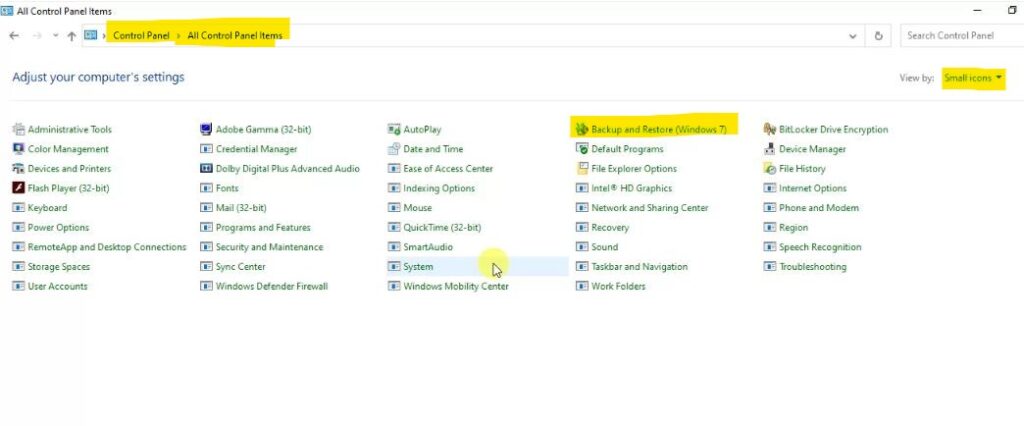
From the control panel, go to the Backup and Restore(Windows 7) option, as shown in the figure below. Search control panel from the search bar to open the control panel. If you cannot view the Backup and Restore option, change the view of the control panel to small icons from the top-right side.
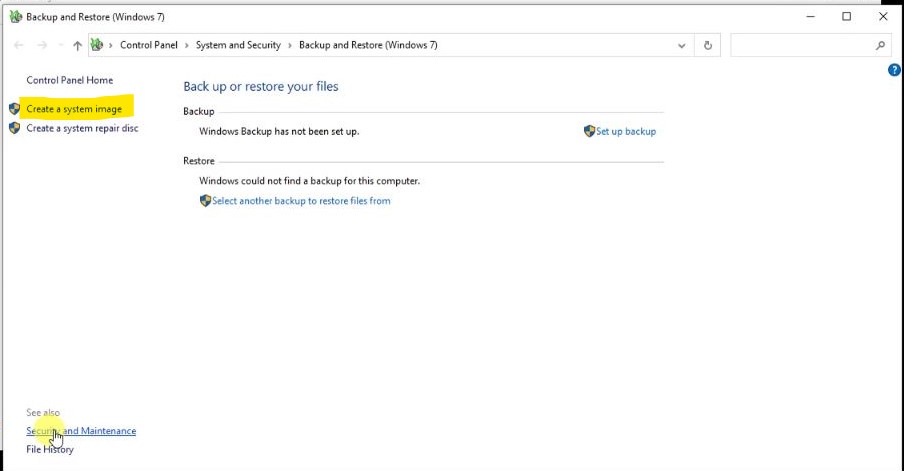
The Backup and restore screen will open like the following image. Click on Create a system image as highlighted in Figure-2.
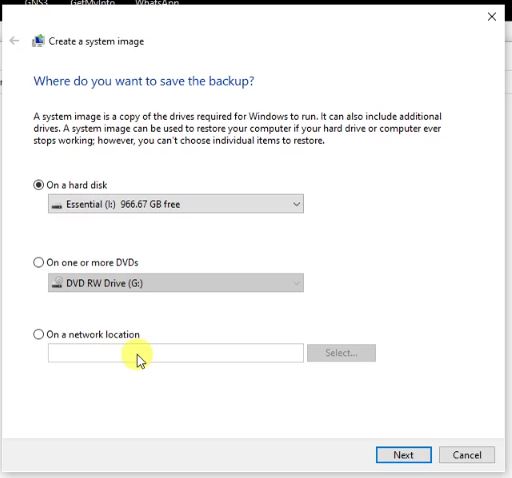
The system will look for the storage for the image backup and display the available options, as shown in the following figure. You can also keep the image backup in the network location. It may be network storage or a hard disk drive in another computer in the network. Select the appropriate drive and click the next button. You can access all the connected disks from the drop-down menu.
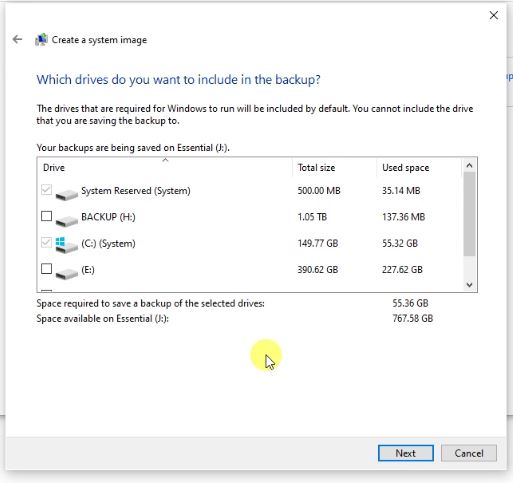
Once you select the target disk and proceed, the system will display the source drives to be backed up. As you can see in the image below, the system reserved drive and the boot partition (C: drive) is selected by default. You cannot unselect them. However, you can select more partitions to be backed up. The status shows the available space in the target drive as well as the space required for the image backup. You can choose more drives for backup if your disk space permits it. Else, go with the default option. After selecting the source disk drives, click the next button to continue.
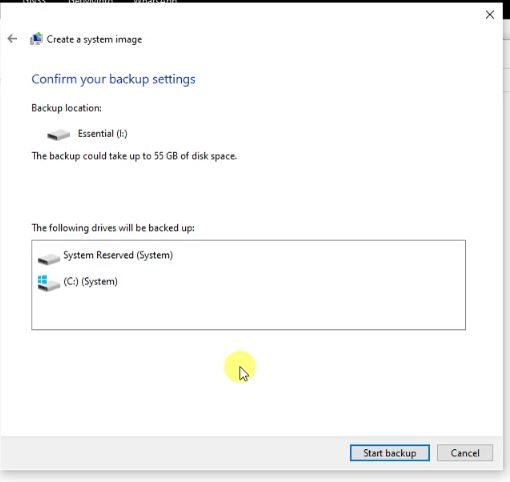
On the next screen, you can view the summary of image backup. You may revert from the back arrow to make any changes; else, click the Start Backup button to proceed.
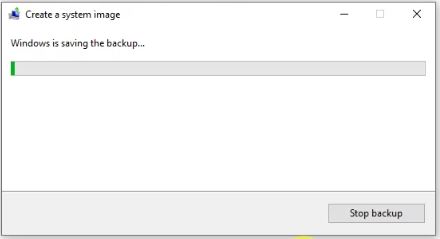
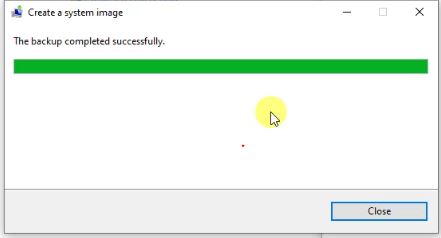
Now, you will see the progress bar and the success message. It may take several minutes to complete the backup depending upon the size of the backup and your system performance. Hold back and wait for the process to complete.
How to restore PC from the image backup?
If your windows system crashes, you may restore the backup from the image backup. It will restore your PC operating system, settings, applications, and data as on the date of the image backup. For the backup of the files added after the date, you have to configure the File History option, which I am going to explain in the next section.
If your PC crashes, connect the drive containing the image backup and start your PC. From the recovery console, go to the Advanced Options.
To know more about the recovery console, please refer to another blog on Backup and Recovery. If you are not able to access the recovery console, you may need a system repair disc to initialize the Windows OS. The process is explained in the third section of this article.
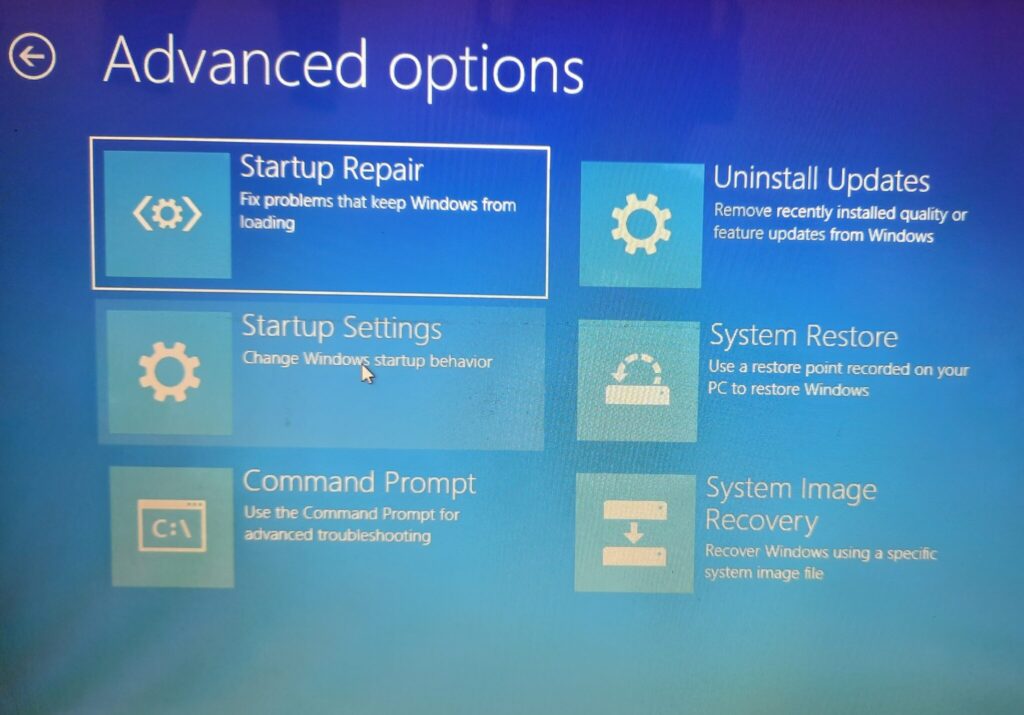
From the Advanced Options, click on the System Image Recovery from the last tab, as shown in Figure-8. It will automatically detect the drive containing the image backup.
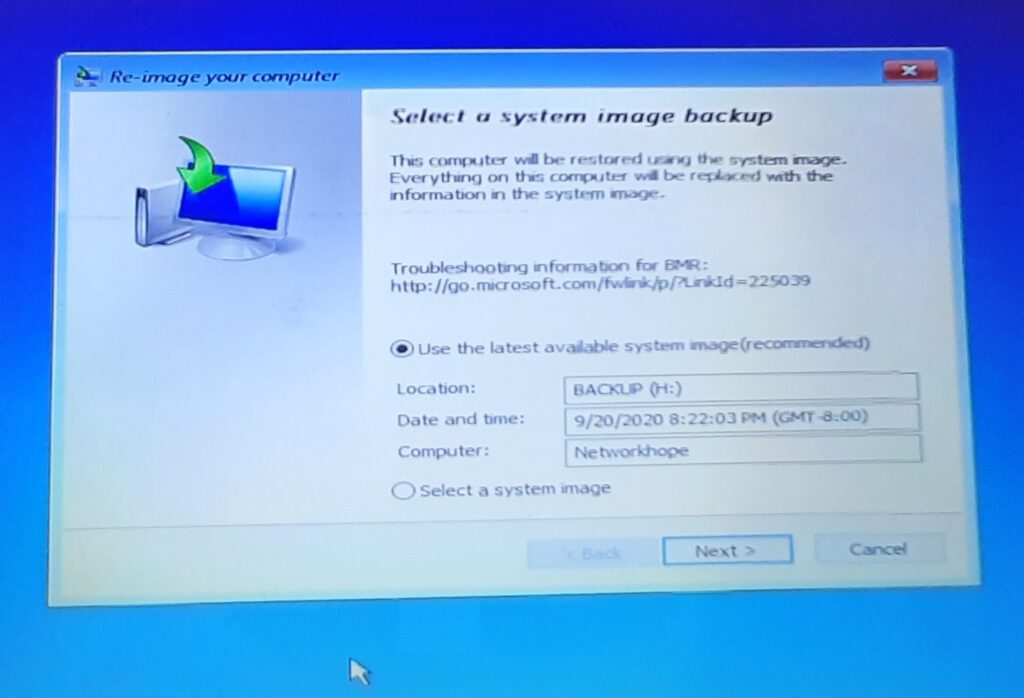
As shown in Figure-9, Windows will automatically select a drive with image backup. If you are fine with the selected drive, click the next button. If you have another image backup, check the radio button Select a system image, and click the next button. You will find all available image backups, select the suitable one.
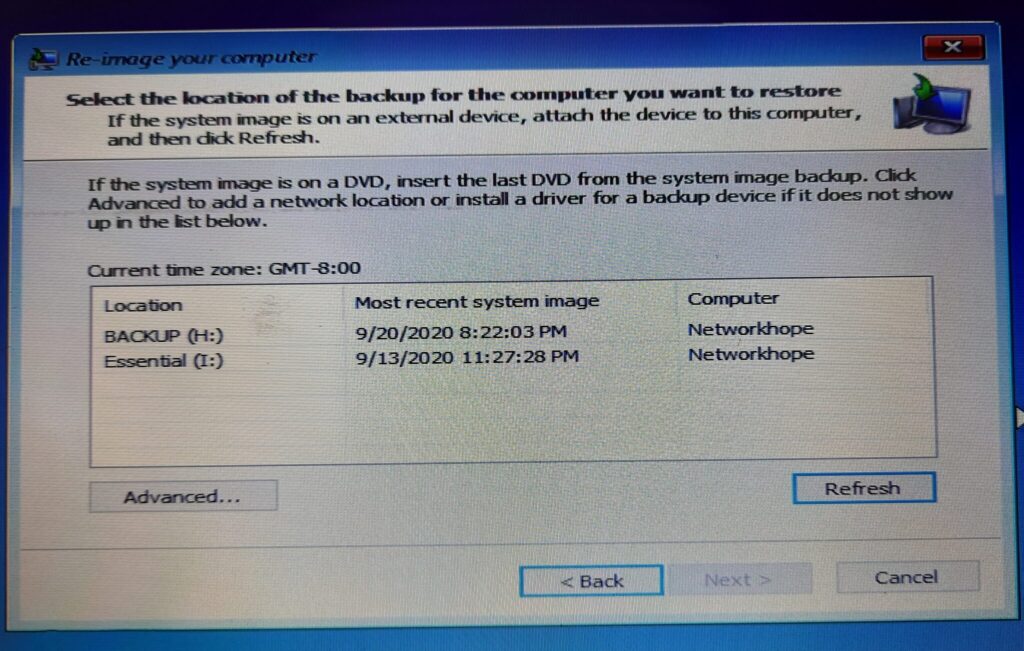
If you have an image backup in the Network, click the Advanced button as shown in Figure-10. If you are not able to view your connected drive, click the refresh button. From the Advanced button, you can see the following options.
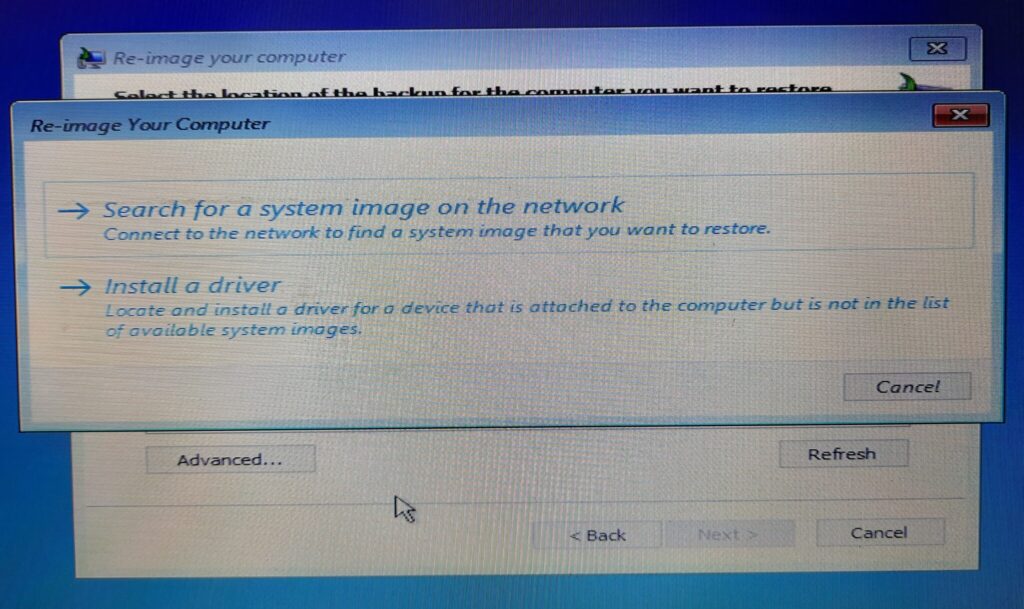
You can browse the network, or install a driver for your device if it is still not appearing in the list.
After selecting the suitable image backup, click the next button to recover the PC from the image backup. In this way, you can Configure Backup and Restore in Windows 10 using the system image backup.
2. File History: Configure Backup and Restore in Windows 10
With the file history, you can back up all the files to an external drive. Windows will automatically take the backup of files whenever the drive is connected. The Advanced setting option offers you to configure the frequency of backup; it is set to one hour, by default. You may restore files from the drive if you miss some files after system recovery or due to any other reason.
The File History will save complete files of the active user. The user’s file includes the desktop, download, documents, video, pictures, games, and other application data. However, the file history doesn’t save the files and folders from other drives like D, E, etc. of your PC.
How to set up the File History?
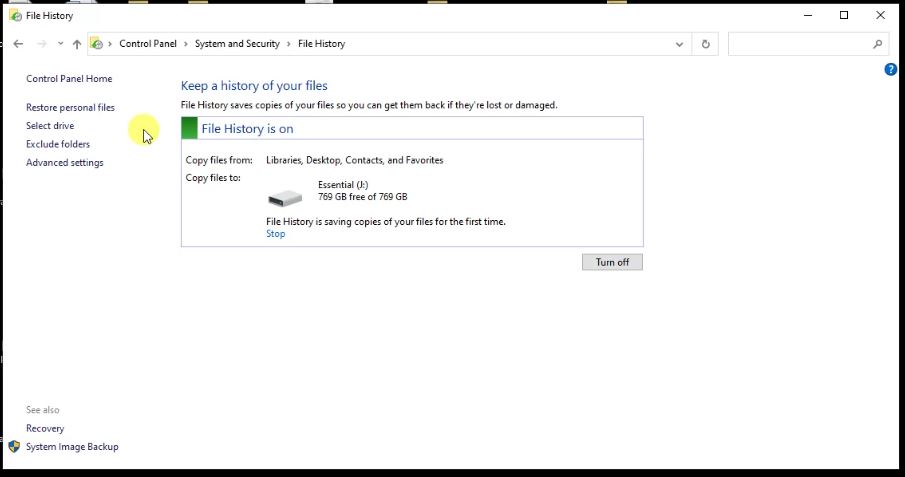
You can access the File History from the control panel as shown in Figure-1 or from the bottom-left tab of the Backup and restore wizard as shown in figure-2.
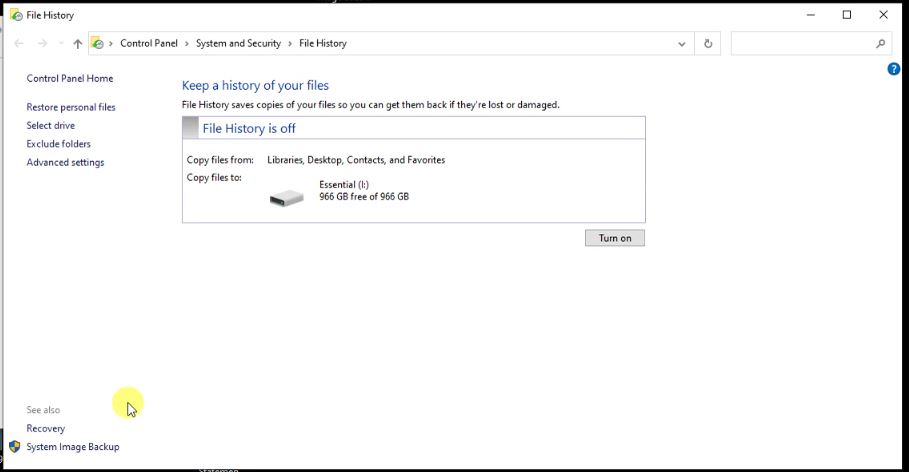
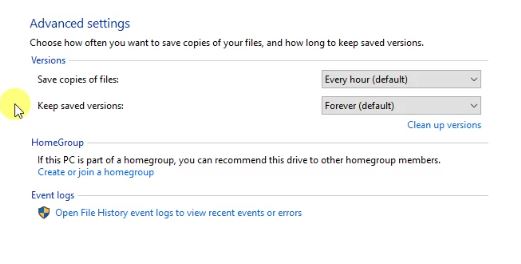
The File History will look like the screen shown in figure-11. From the left pane, you have options to select the drive from the list of available disks. You can exclude the folders from being backed up. That will help you to save space. From the advanced setting, you can change the backup synchronization frequency. It will automatically backup files when the drive is connected. You can also open file history and Run backup to synchronize the files of your PC to the file history backup.
The advanced setting screen has the option to configure the interval of backup as shown in figure-12. You can also clean up the older versions and keep a fresh one. You can also configure how long the backup files should be retained.
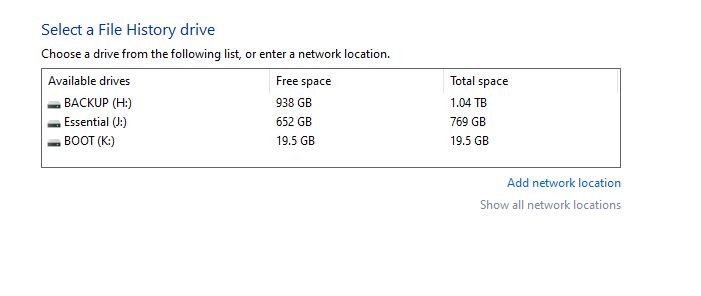
With the Select Drive option, you can choose the target drive from the list of available drives, as shown in figure-13. You can back up the files in the network also from this wizard.
After setting all those options, you can start the file history by clicking the Turn On button, as shown in Figure-11. It will start saving the copies of your file to the selected drive, as shown in figure-14.
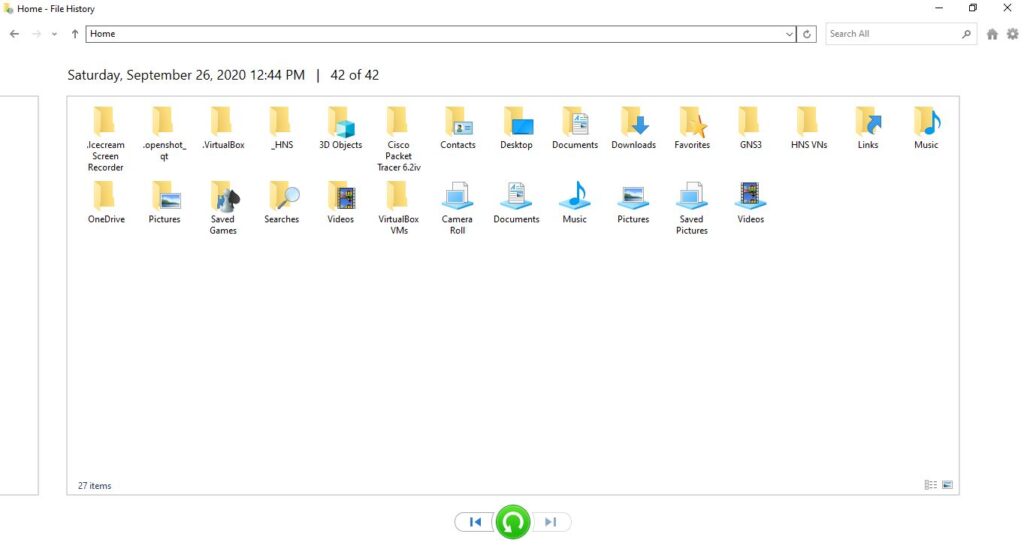
Once the backup is completed, you can disconnect the drive. You can restore the files from the option Restore Personal Files, as shown in Figure. You can restore a single folder or an item inside the folder by simply selecting the object and clicking the Green Restore button at the bottom.
3. Create System Repair Disc: Configure Backup and Restore in Windows 10
If the Windows could not start the recovery mode then you will need a bootable disk to repair the Windows OS. If you have a image backup to restore your OS completely but cannot access the recovery mode when the Windows start, then you should have a system repair disk to install the backup. The Image backup is not a bootable media, you have to boot the PC first and enter recovery mode. Then from recovery console you can install the image backup.
To create a system repair disk, you need a DVD and a working DVD drive. To create a system repair disc, follow the process in section-1, Figure-1 and Figure-2.
Control Panel> Backup and Restore (Windows 7)> From Backup and Restore wizard select Create a System Repair Disc from the left pane.
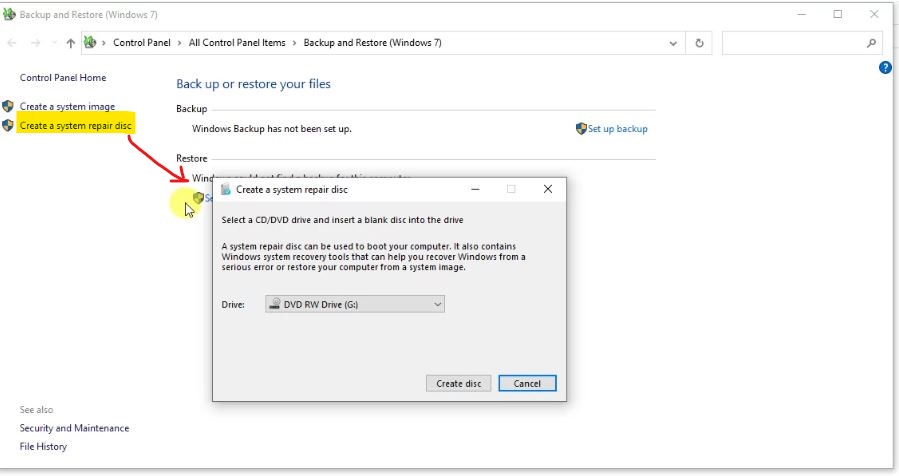
Insert a blank DVD and click on Create Disc button to make a new repair disc.
Restore PC with the System Repair Disc
You can use that DVD in case your PC fails to start. You will be prompted to enter recovery mode while booting. Once you enter the recovery mode, you can restore the PC with the system image backup drive. You can also perform the system restore, Reset windows tasks as explained in the previous blog.
Note that, this DVD does not contain the complete OS backup. This will need other backups to complete the installation.
4. Create a recovery drive: Configure Backup and Restore in Windows 10
It is almost like the system repair disc, but it can optionally contain the full OS copy for installation. Keep in mind that the system repair disc and the recovery drive are meant for the same PC only. It may run on the other PC only if the make and model, hardware configurations are exactly the same.
To create a Recovery Drive, make a partition on your external hard disk, or use a USB drive. It will erase all data of the target drive, so ensure the drive to be free from any important data. From the File History screen, as shown in Figure-11, click on the Recovery tab in the left pane bottom.
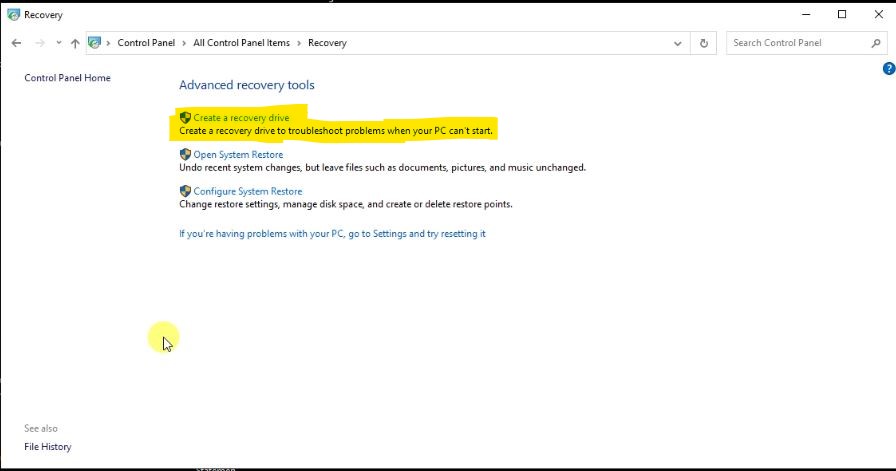
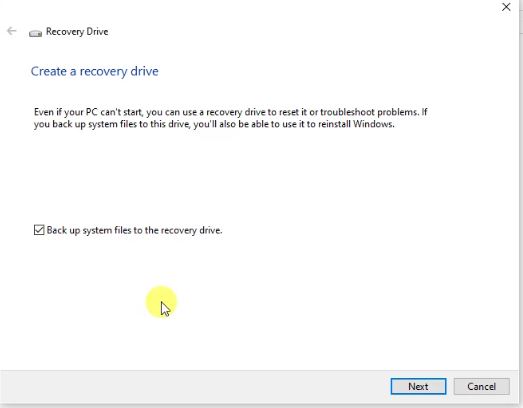
The recovery wizard will open, as shown in the above Figure. Go with the option Create a Recovery Drive. Now the next screen will have a checkbox for the backup of the system files.
Please check the box at the bottom, as shown in the figure below, if you wish to copy the system files completely. Else, it will work almost like the System Repair Disc. If you check this box, it will contain the full image of the Operating System.
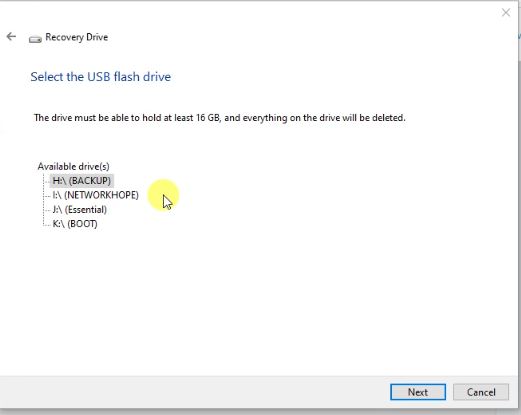
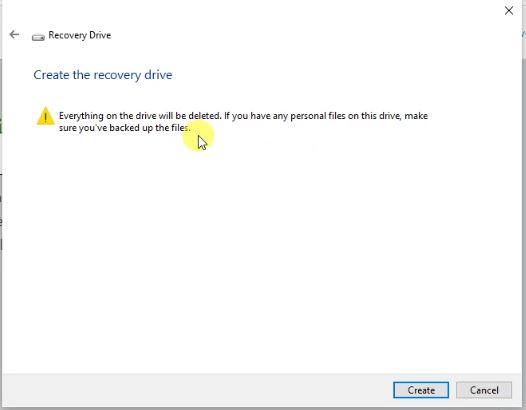
Check the box and click the next button; it will look for the available drives and will display the options, as shown in the figure below. Select the appropriate disk and proceed further. See the warning, it must be able to hold 16 GB; and the drive will completely be erased.
After selecting the disk and clicking the next button, you will get the following screen.
Now, click the Create button to create the recovery drive. After the successful creation, you will get the success message. You may eject and keep the drive at the safe location.
How to restore with the Recovery drive?
If your PC fails to start, you can restore it from the Recovery drive. Set the first Boot priority to the USB drive from the Boot Menu or the Setup. Now, start your PC with the USB drive plugged-in. You will get the following option at the start-up.

The system will ask for the keyboard layout, select one of your choices, and proceed. The next screen will have an option to Recover from a Drive.
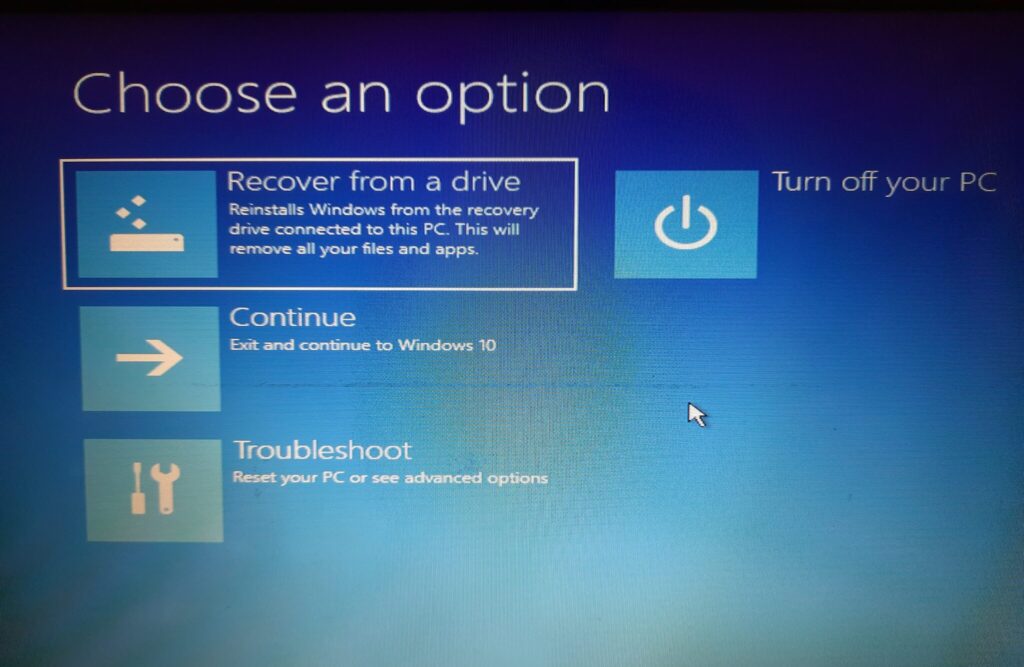
Select the option Recover from a drive and follow the instructions. It will completely format your PC and reinstall the OS. After installation of the OS you may use the image backup, file history or the backup and restore drive to recover the complete PC.
5. Backup and Restore utility
It is the full backup of the system which includes the Backup file as in Windows 7 as well as the image backup of Windows 8 onwards. You can restore the files and folders saved from Windows 7 to a Windows 10 PC using the Backup and Restore utility. At the same time, if you take this backup in Windows 10 PC, it will also include the image backup folder.
Once you take a backup from this utility, you don’t need to take separate image backup. Unlike image backup, which restores a complete backup of the drives, you can use customized restore in this backup.
How to take complete backup with Backup and Restore?
From the Control panel go to Backup and restore (Windows 7) utility.
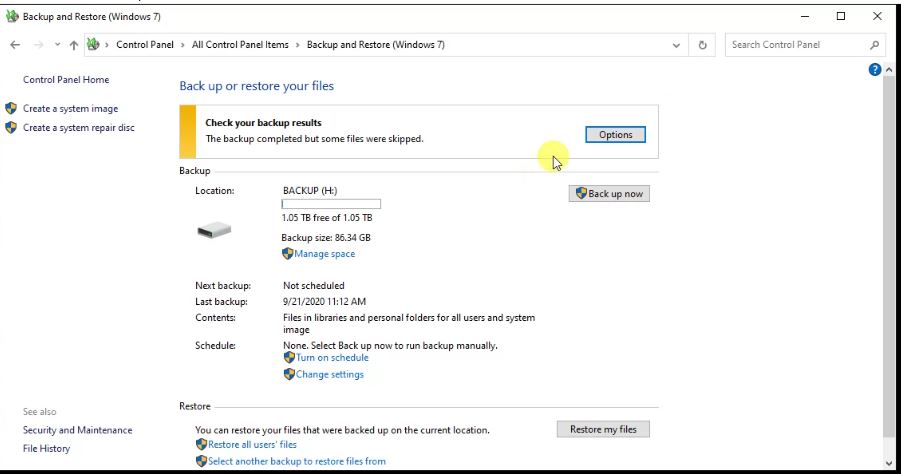
If you have already configured a backup drive, the screen will look like the above image. Else, you will be prompted to set up the backup drive. From this screen, go to the Change setting tab to set up a new backup.
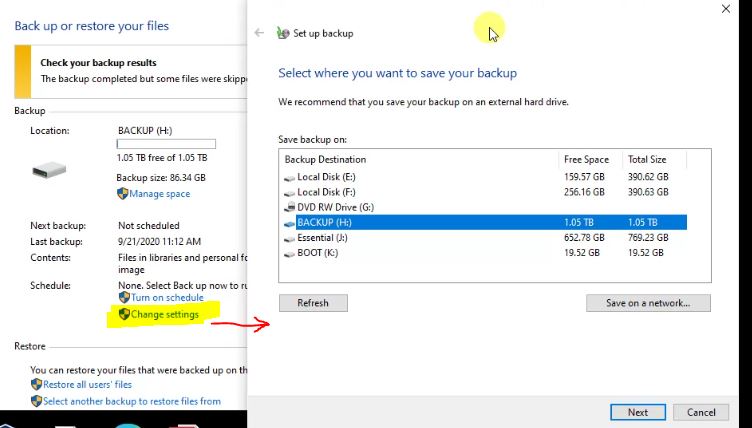
From the change setting, it will search the available drives. Select one drive for the backup from here. You may also save it on the Network location.
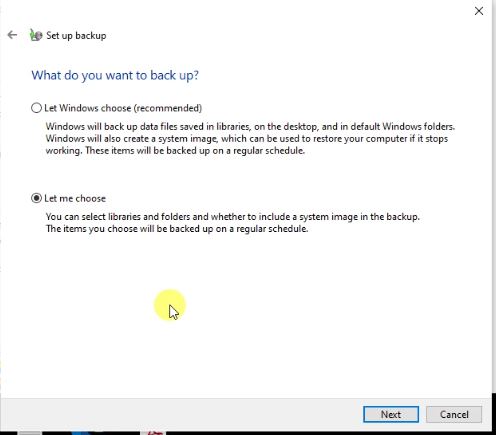
Here you will get two options. You can customize the data to be backed up or skipped. If you are not sure go with the recommended option, i.e., Let Windows choose. After selecting an option, click next to proceed.
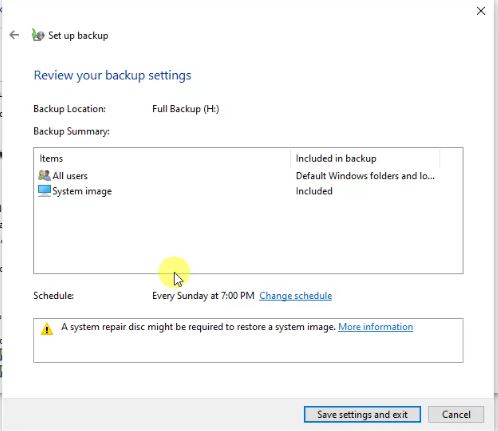
The next page will show you the summary of items being backed up. As you can see in Figure 26, it will back up the data of All users and also a system image, by default. Once you complete the setting, click on Save settings and exit button.
From the main menu of Backup and Restore shown in Figure-23, Click the button Backup Now to start the backup process. Once the backup is completed you can view the files on the drive. It will contain a Backup folder and an d image backup folder. The backup folder cannot be opened, you have to access it with the utility Restore all users Files from the main menu of Backup and Restore, as shown in Figure-23.

There are several options like Manage Space, Turn On/Off Schedule, Restore, etc. You can customize those options whenever you connect the drive to your PC. It will take the incremental backup whenever you connect the drive and update the backup. It may also take it automatically with the configured schdule.
How to recover Files and system from the Backup and restore utility?
As you have a backup files of all users, you can restored it from the backup menu itself. If the system fails to start you may use the image backup with the same process explained in the first section of this article.
You will be guided by the wizard to customize the backup process as well. However in image backup, it will automatically decide the files to be backed up including the system image, setting, application, etc.
If you liked the article, please drop a comment. You may also follow Network Hope from the social media links at the top of the page.