Today I will illustrate how to create a Bootable USB Drive. Probably you know the purpose of creating a Bootable USB drive and how to work with it. I will illustrate step by step using Power ISO software.
Power ISO is legally available for free download, though its premium version is a paid one. But the unregistered version will solve the purpose, you just have to bear with a few seconds wait at the start. You may download an unregistered version of it for free or you go for registered for the full feature.
Why you need a bootable USB?
You all may have seen the optical media (CD/DVD) containing a copy of the Operating system. When you purchase from a vendor, or you may have downloaded from the web. A lot of Operating Systems are freely available on the web, as a number of Linux variants. You may also download Windows OS trial versions legally if you have the genuine license key to activate.
But keeping all those files in Optical media is troublesome, and also they are very much prone to damage. Most of us keep the Operating Systems ISO images in internal or external Hard drives. It is safe, as you can make multiple copies and store them on different drives.
When your system crashes or due to any reason it has a booting problem etc. In those cases, you either have to restore it from a backup like a system restore, reset, Image backup, etc. whichever is possible or you have to go for fresh OS installation. We will talk about image backup in some other article, which is a very good option to keep your apps, files, etc. safe.
In case, you want to go for a fresh OS installation, the ISO file kept in your drive, or one you have downloaded, can not be loaded directly. Now you have to either go for burning a DVD or make a pen drive bootable. Let’s come to the point, how to make it bootable.
Create a bootable USB drive: What you need?
- An ISO file of OS
- A pen drive of 4 GB or higher capacity, (depends upon ISO size), if the ISO file is more than 4 GB, you have to go for a 8 GB pen drive or higher.
- An operational PC
- Power ISO software (Registered or unregistered)
How to create a Bootable USB drive using Power ISO
Now you are all set to create a bootable USB drive. Just plug in your USB Drive, ensure its blank or you have backed up the contents.
Warning: This will erase the Pen drive completely, so don’t forget to back it up before proceeding further.
Now launch the Power ISO software, you may open it as an Administrator, or just double click it to open. The following screen will appear.
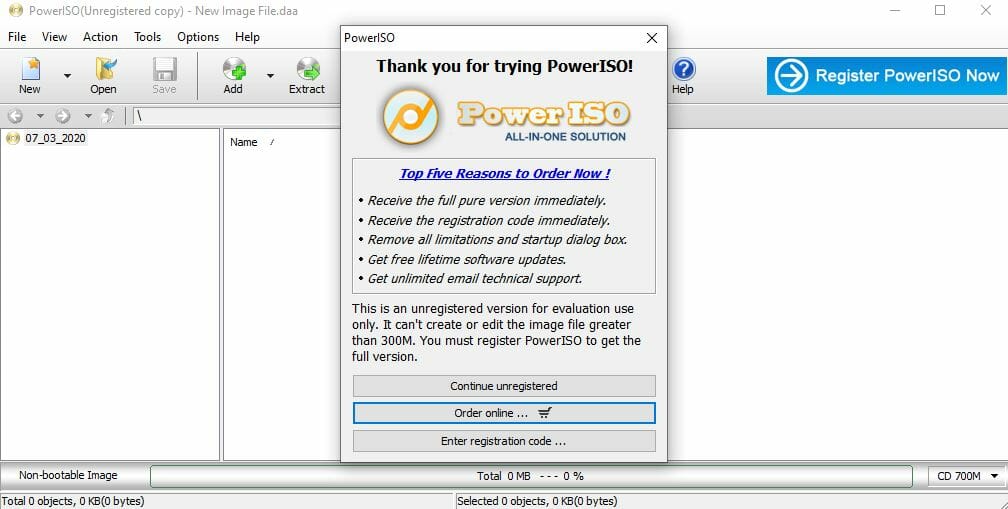
If you are using an unregistered version, go for “Continue Unregistered” option, else you may register it with the key you purchase. Here, you have to wait for few seconds countdown if you are unregistered. It doesn’t really matter, as the software works fine after that wait.
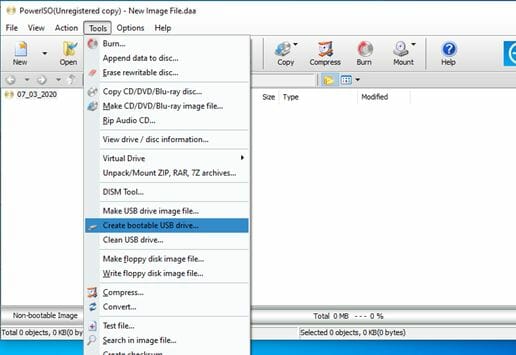
Now go to the “Tools” menu, the drop down menu will show the option, “Create bootable USB drive” as shown in figure below.
When you click on the “Create bootable USB drive ” option, if you have not run Power ISO in Administrator mode, it will prompt for that like the figure below.
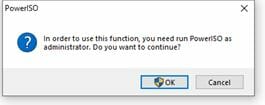
Just Click OK and let the application restart. It will prompt for permission to run in Administrator Mode. Click OK again. The power ISO will start with the “Create bootable USB drive ” window flashing upon it as shown below.
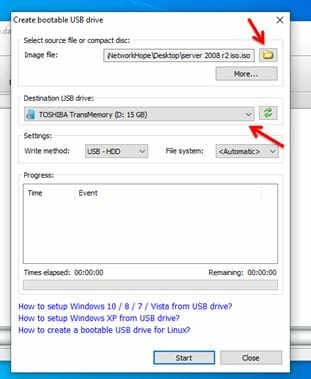
Here you have to be a bit cautious,if you have more than one USB drives plugged in. As indicated by the red arrow, there is a Browse icon. From this browse button you can navigate to the ISO file and select. It shows the full path of your directory in the text-box.
Another red arrow shows that there is a drop down to select the USB drive. If it does not show your USB drive, you can refresh it with the green refresh buttons. Select your target USB drive from the drop down. Better you plug in only one drive, so that there is no confusion. Else you should precisely choose the correct one if you have multiple USB drives plugged in.
Once you set up both the things properly, hit the “Start” button. You will get the warning message like shown below.

The warning message shows “All data in the USB drive will be overwritten.” Click OK and wait for the process to continue. It may around 15 minutes depending upon the file size and the Flash drive speed.

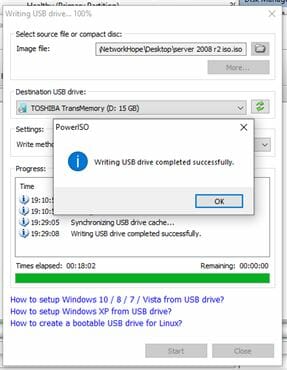
Please sit calm and be patience till the left image comes to right image status. After successful creation of bootable USB, a message box as shown above.
You may plug in that USB drive in any faulty system for fresh OS installation.
Share this article, and keep following for new articles.


Nice