
In this article, I will explain to you how to Create a Bootable Pen drive from Command Prompt. Command Prompt is a built-in CUI tool that enables you to create a bootable Pen drive.
In continuation of my last post “Create a bootable USB drive“, this is another method of creating a bootable Pen Drive. Why do you need to create a bootable drive, what do need to create a bootable Pen drive, both the things are explained earlier in the same post.
Please note down, once you create the bootable Pen Drive, When you need to boot from USB/ Pen Drive, do some settings in BIOS of your PC.
- Change the boot mode from UEFI to Legacy.
- Turn the Secure Boot OFF.
- Set your USB Drive as the First Boot Device.
Now, Let’s see how to create a bootable pen drive from the command prompt.
How to create bootable pen drive from command prompt
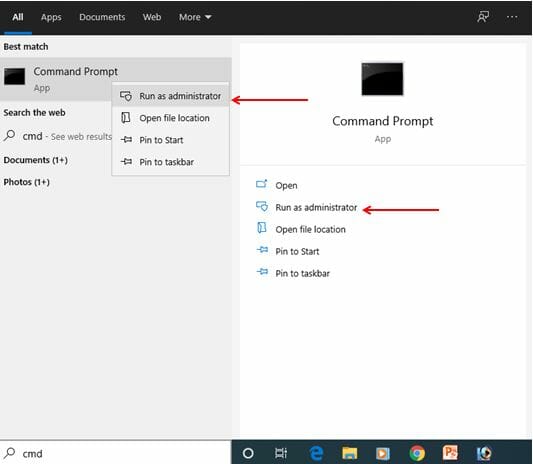
First, open the command prompt in Administrator Mode. There are two ways of doing so.
From the search bar, type “CMD”, then the command prompt icon will be displayed. Right-click on the icon and click “Run as an Administrator”.
The second method is :
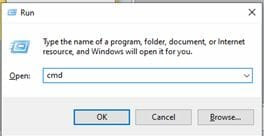
Press Windows logo+R to open the Run command.
Type CMD in Run command.
Now press Control+Shift+Enter together.
In any of the above cases, a UAC warning message may appear, press OK and proceed. If you have set UAC (User Account Control) off, then you may not get the message.
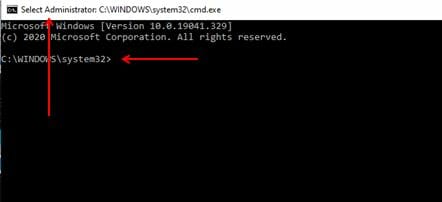
When you open Command Prompt in Administrator Mode, it has a unique identification that the prompt will show your current directory as “C:\WINDOWS\system32>” by default and not at the title bar it will display “Select Administrator” as shown in the figure.
Using Diskpart utility
Plugin your USB drive first. Now we will use the utility named DISKPART. To enter, type “diskkpart” and hit Enter.
The prompt will change to diskpart as shown in the figure.
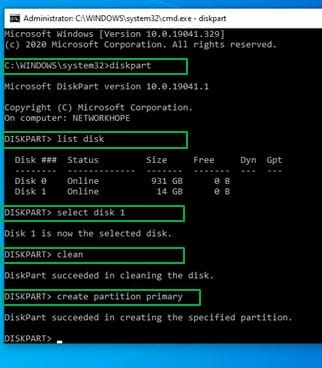
Type list disk and press Enter.
The list will show the disks, disk 0 is the system hard disk and disk 1 is the pen drive. (If you have more than 2 drives the check accordingly.)
Now type select disk 1 to select the pen drive as a current drive.
The message will be displayed, Disk 1 is now the selected disk.
Type clean and press Enter.
This command will erase the disk, after successful cleaning the success message will appear.
The next command is: create partition primary. To create a primary partition in the Pen Drive. Type and press enter as shown in the figure above. The success message: “Diskpart succeeded in creating the specified partition.”
So far, you have created a partition as Primary Partition, now first select that partition and set that Partition as an Active partition. You may also check the partitions by the command list part. Since there is only one partition, its partition 1.
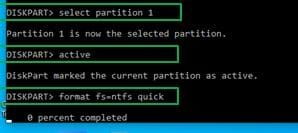
To select the partition, type select partition 1 command.
The confirmation message “Partition 1 is now the selected partition” will appear.
The confirmation message “Partition 1 is now the selected partition” will appear.
Once you have selected the partition, set that partition as active.
Type active and press Enter as shown above. Now, everything is almost done. You just need to format the drive. You can format using NTFS or FAT32. If you are not booting on UEFI mode and gone for Legacy as I have mentioned at first, you may go for an NTFS format.
Type format fs=ntfs quick and hit enter. This will take a little bit of time. You may check the progress in percentage.
After the successful format message, you are done with the “diskpart” part. Type exit to come back to the command prompt.
Copy files using drag and drop or Command Prompt
Now you have to copy the files from OS to the Pen Drive. Here, a little bit of understanding is needed. If you have it in CD/DVD media, you can copy all the files from DVD and paste to Pen drive or Drag and Drop in a conventional way.
Well, if you have ISO file in the drive, copy-paste will copy the ISO image and not the file with its structure. You have to open ISO image in any application like WinRAR, Power ISO, Magic ISO, or any other application you know. Here I am doing it with Winrar. Just open the ISO file in Winrar and copy all the contents and paste it to Pen Drive.
For me, an NTFS formatting, copying from WinRAR, Secure boot OFF, boot mode Legacy, First boot device USB – this combination is working fine with no issues.
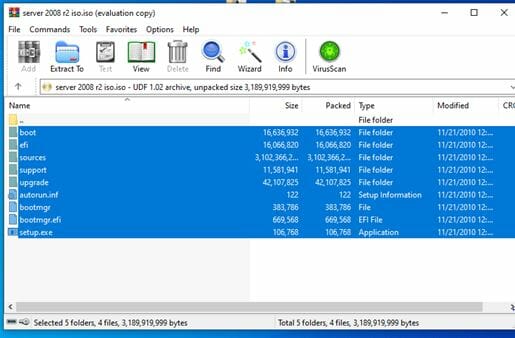
Open your ISO image in WinRAR, copy all the files from WinRAR like this. Now paste it to the Pen Drive. It’s done.
If you want to copy from the command prompt, you have to use the xcopy command in the following syntax.
xcopy source destination.
The source is optical drive E, Destination is Pen drive H in the following example. So, the command is :-
xcopy E:*.* H:*.* /S /E /F
The switches define additional options and parameters. Switch /S is for all sub-directories except the empty one. Switch /E means the Empty sub-directories and /F is to show the full source and destination name while copying.
You may try this as well. Remember,this command will not be executed from diskpart. Come out of diskpart by Exit command, run xcopy. Then again exit for exiting Command Prompt.
This was all for creating a bootable Pen drive from Command Prompt.
Leave a comment, suggestion, or feedback, from the form below. Your email ID will not be displayed anyways.
Ye b sahi tha sir👍🏻