Today I will explain how to create a new user account in Windows 10. Before going to create a new user account in Windows 10, let us first know how many types of user accounts are there in Windows 10.
Like earlier Operating systems in Windows NT series as Windows 7, Windows 8, Windows 8.1; Windows 10 also has two privilege levels in Local Account. A local account is something with which you may log in to that PC. You must need to know the local account of all local computers while sharing files and Printers in a Workgroup.
The administrator and the Standard User
The User privileges in Windows 10 are Administrator and Standard Users. Administrator Account can perform all the tasks related system setting whereas the standard user can use the applications, create, modify, read, the files. Standard Users cannot make system-wide changes but they can run most applications.
For installing new software, changing the system settings, IP address, installing Hardware drivers, Sharing files and folders, Sharing Hardware resources, etc. you need an administrator account. They have complete unrestricted access to the system.
By default, Windows has One built-in Administrator account, which is disabled by the system, One standard account named Guest account is also disabled. You may enable them if you want to.
The user account in which you are working has a customized name with administrator privilege. At the time of installation Windows asks you the username and password, which becomes the current administrator user account of your PC. The windows automatically disables the built-in administrator account .
Which account to use ?
As per the recommendation of experts, one should work with restricted privilege even in his/her private system. There is a great benefit of security if one uses the standard user account. If you are an Internet user, browsing with full privilege creates a vulnerability in your system. The malware attached to emails or driven by your download is supposed to be installed on your PC without your direct consent.
Before creating a new user account, you should first decide the purpose. If a user going to work in Applications and does not need to change the system setting, then go for a standard or restricted user account, else you may create an administrator account also.
When you download free software from unreliable sources, you may become a victim of malware attacks. So, it’s always a sensible step to use your computer in a restricted account, so that no malware can be installed in your PC unless you provide another credential with administrative rights.
This topic will cover Creating a new user and assigning or removing privilege. For renaming User and other management of user accounts Read this blog.
Create a new user account
Before creating a new account, I recommend you to back up your files in some drive, internal or external. The User’s files are placed in a single folder by windows under the Username. To know about the files saved by Windows, please read this.
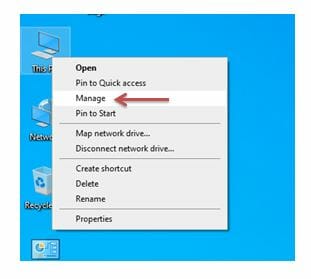
First, go to This PC icon at desktop and Right click, then click on Manage as shown in the figure below.
If you did not find the “This PC” icon in the desktop, Follow my other blog How to add desktop icon in windows 10.
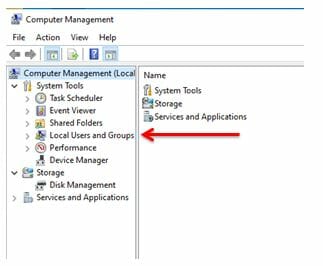
Now the Computer Management Snap-in will open as shown in the figure below.
You can see the screen on right (For mobile browser, it’s below this text). In the left pane, you will find the “Local Users and Groups” label.
I have highlighted all the important labels on the screen with a red arrow mark, so that you may locate it immediately.
Expand that level, the next screen will show you all the active and inactive users. The disabled users will be marked with an arrow-like icon.
Local Users and Groups
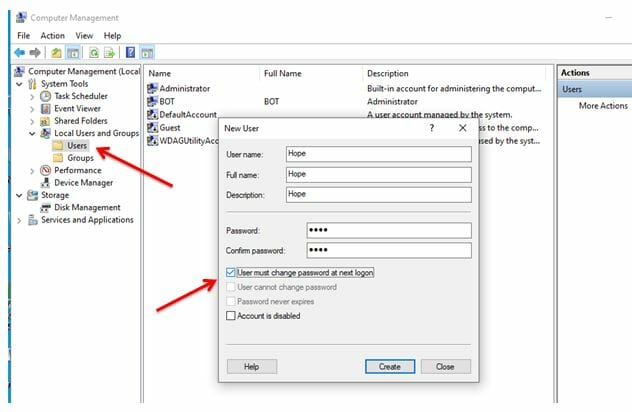
Refer to the image above. Under Local Users and Groups, there are two options- Users and Groups. Select Users and see in the workspace at the center of the window. It displays all the local users of your PC. In my case, the top two users are active, and the rest three are disabled, you can easily differentiate the small icons there.
At the blank Space, Right-click and Click “New”, You will get this wizard for New User. Fill the form as shown. Remember the username and Password. You may give the same name to User Name and Full name for easy remembering, else you may give differently. Remember that, the name given in the Full Name column will be the New Username of PC.
There are four check-boxes at the bottom, read them carefully, and decide whether to check or uncheck them. If you are not sure, keep all of them Unchecked. Checking the last one will disable the account. After completion, just hit the Create button. You will get the previous screen with one more user added to it.
Assign privilege to the User
Once you created a user account, you may check the privilege of the user. By default, it will be a member of the “Users” Group, which is a standard user with restricted privilege. You may keep it like this, else if you wish to give the user the Administrator privilege, follow the step below.
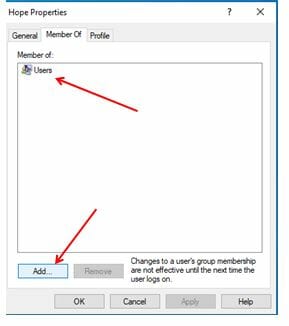
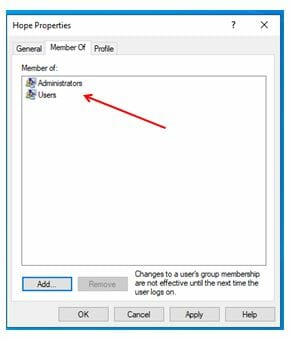
To check the privilege or User type, Right click on the new User from Local Users and Group> Users Screen as shown earlier. Go to the properties of User. In Properties window, go to Member of Tab.
Assign privilege by adding to a Group
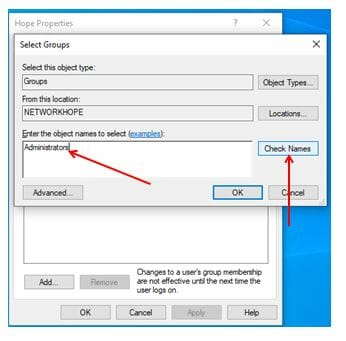
The user will be a member of the “Users” Group. (“Users” is a built-in Group). You have to Add user to another group named “Administrators” for the higher privilege. To add a user to another group, Go to the Add button at the bottom left as shown in the figure above. The image below shows the new screen.
Here type “Administrators” as shown and click “Check Names.” If the group name is correct, it will be underlined, Click OK now, apply from the previous screen.
Once you complete this, check the properties of User again, It will show Member Of Users as well as Administrators. You may remove them by just selecting and clicking the Remove button.
Well, this does not directly change the user from Standard to Administrator rather it adds it to Administrator Group. There is no difference practically, this is Domain environment’s default way to add or remove multiple users using the same Window. This does makes very much difference for a single PC with a handful number of users.
Assign privilege using Netplwiz Command
You can try this to change the User from Standard to Administrator and vice versa.
Type “netplwiz” from Run command, and hit Enter. You will get this screen.
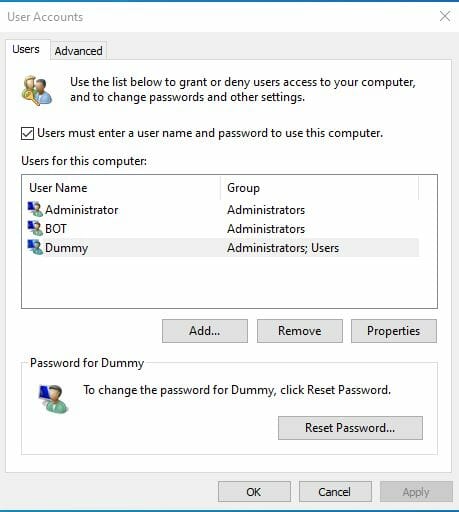
In the first Screen, you will get the list of Users. You can Add or Remove Users from this Screen. You may also change the password of existing users from the Reset Password button for the selected user.
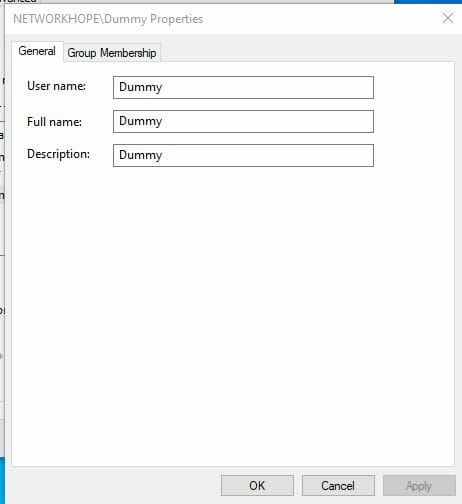
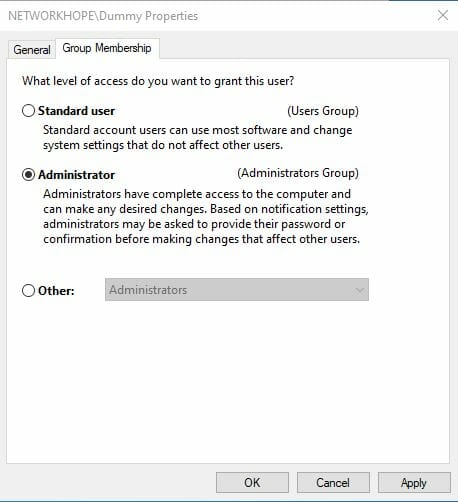
Or select a User and Go to it’s Properties. There are two tabs – General and Group Membership. In General tab you may change the Name, Full Name and Description. From Group Membership you can assign the user as Standard, Administrator with the help of Radio button. If you Choose Others button, It will show all the available Groups in a Drop Down Menu. You can Add user to any group from here also.
Beside these methods, there is also Users Account Setting in Control Panel, from where you may change the users properties.
Verifying User Account
After saving all your other works, now go for a restart. Windows will prompt you all the Users (Active Of course). Go for the new one, you have just created. Login using the password you have given.
Since its a new account you have to add the icons to the desktop. If you are not sure how to add them- Read it here.
Now Check the folder C:\Users, and look for a folder named as new user. In my case “Hope” is the username. Similarly, you will get a folder with your username in place of Hope. Now you open Command Prompt, Windows Logo+R, Type “cmd” press Enter. Here the command prompt will open with prompt “C:\Users\Username”.’
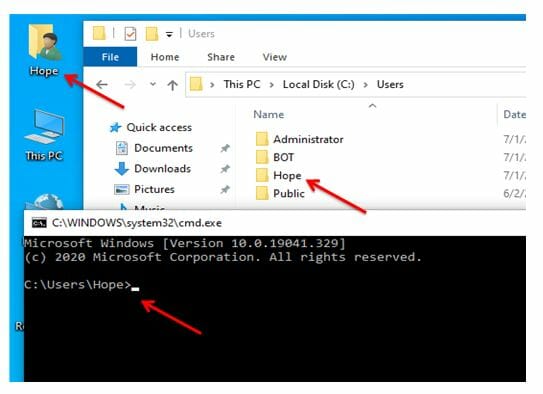
If everything is the same as shown here, your new account has no issues and working fine. Now you have accomplished the Create a new user account in Windows 10 Part.
Hope you liked the article. Follow up will give you the idea of changing the names of the User account.