In this blog, we will discuss how to add desktop icons in Windows 10. Besides we will also talk about the default desktop icons and file types. When you install a new OS or create a new user in the existing OS, you need to add the default icons to the desktop. That is a convenient and easy way of interacting with the Windows OS.
In earlier versions, adding desktop icons were pretty easy as you get An “Add Icon” option in Desktop shortcut Menu (Simply by right-clicking in desktop blank space). Windows 10 has hidden this option and placed it under the Theme setting.
Firstly let us see, what are the icons provided by Windows 10 under this option and how can we use them. Then we will go for the Option Add desktop icons to windows 10.
Add desktop icons to Windows 10: Icons list
These are the five icons that is provided by windows to add in desktop screen.
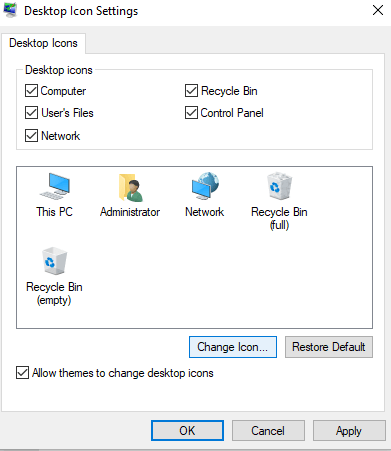
- Computer (This PC)
- User’s File
- Network
- Control Panel
- Recycle Bin
When you install the new Windows you will find only recycle Bin on desktop. Rest icons you have to add if you wish to.
Besides, it will be also helpful if you accidentally delete one or more of those icons. You can add them to desktop whenever you like with this method.
Use of these desktop icons
The icons are needed frequently by a user during the desktop operation. Let’s see how they work and what are the important needs. So that you may know, which icon to keep, and which one not to. So that you don’t need to gather unnecessary icons around your desktop. Keeping your desktop clean and up to date is also an art like housekeeping.
This PC: Known as My Computer in an earlier version, still some people prefer to call it like that. It is important for all users because from here you can browse all your Drives-( Internal or External), Files, Folders, etc in the Explorer window. Without this icon, you will be confused about where to click, when you put an external drive like DVD or a Pen Drive. Though you may use the shortcut key Windows Logo+E for opening the Explorer, try it.
Besides, the right click on this has an important shortcut menu for Computer Management Console, Map Network Drive, System Properties, etc.
Network: This is important for accessing the Connected computers in the network. You can just open it to view and access (If permitted) the computers in the network.
Right-click on it will give you a shortcut menu for Network and Sharing Center from Properties, where you can do all the IP Configuration like stuff.
If you are not working on Network environment, you may opt not to add this icon.
Recycle Bin: You all know the use of it. It contains deleted files, from where you can restore or delete permanently. It is by default there on desktop.
Control Panel: It is the panel where all settings of Windows is present. You can do several setting related things from Control Panel like Administrative Tools, Date and Time, Internet Options, Fonts, Display, etc. You will find everything you need for the Windows Configuration in the control panel. If you are a home user and don’t go through these settings frequently. You don’t need to keep this icon on the desktop.
User’s Folder: This is important. The folder is named as the current User name. This folder is located at “C:\Users\” location. This folder contains subdirectories like Contacts, Downloads, Documents, Pictures, Desktop, etc. All the work done by a user is placed on this Folder. The folder is secure from other users, only users with Administer privilege can view, or change the content of this folder. The standard users cannot access the folder of the Administrator in a PC.
If you are going to change or delete any user from your computer, you should check these files and make a copy of it at any secure place.
How to add desktop icons
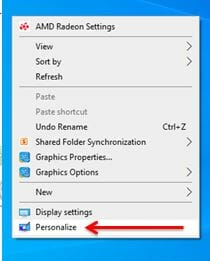
To add these desktop icons, Right-click on blank space of Desktop and select Personalize from the bottom of the shortcut menu.
When you click Personalize, the “personalize” Window will appear.
From the left pane, select Themes and scroll in Right Pane till you find “Desktop Icons Setting”, as shown in the figure below.
Now Click on, “Desktop Icons setting”, this screen will appear.
Now from the checkbox above, check those icons that you wish to see on your desktop. Additionally, you can also customize the icons if you wish. Just select an icon and click to Change Icon button as shown. You will get plenty of icons to choose from. Have a glimpse fro the image below.
After completion, come back to your desktop and see the icons are there. You may sort them by Name, Type, Date, etc. parameters by right-clicking and opting for the “Sort By” option.
Please don’t forget to comment your feed back or suggestion, or Question if any.