What is an IP address?
Before you know how to assign a manual IP address, you should have a brief idea of what an IP address is. An IP address is a 32-bit address used to identify a PC or device in a network. It is a logical address used to identify a device in a computer network. As per the assignment mechanism, we can classify them in Dynamic and Static or Manual IP address.
Dynamic IP
Dynamic IP is assigned by any DHCP server, for example – ADSL modem, WiFi router, A physical DHCP server in your network. Even the network devices like switch and routers can function as a DHCP server. Moreover, while you are using tethering from a mobile phone to your laptop, the mobile phone serves the purpose of the DHCP server.
Moreover, we don’t generally assign dynamic IP to devices like Server, Printer, Network devices, etc. because the Dynamic IP may change at the next allocation.
Static IP
Manual IP addresses are fixed IP addresses assigned permanently, hence it is called Static IP. The advantage of assigning manual IP is that it is secure than the dynamic one, and it does not change. The disadvantage is that you have to physically appear before each PC and devices to assign Ip address. A good practice is to make a list of IP addresses well in advance so that the problem of IP conflict does not arise.
To know about IP conflict refer to this blog Detect IP conflict.
How to assign Manual IP address ?
Here I will explain to you how to assign a manual IP to your PC, Laptop, etc.
For assigning IP, you have to go to the Adaptor setting, there may be more than one adaptor, like in Laptop or All in One PCs, you may get an Ethernet adaptor, WiFi adaptor, and Bluetooth adaptor. In Desktop PC generally, only one Ethernet adaptor is present, In High-End PCs/Servers, you may get more than one Ethernet adaptors.
Methods to access Network adapter setting
There are various ways to go to the Network adapter setting to set the IP address manually:
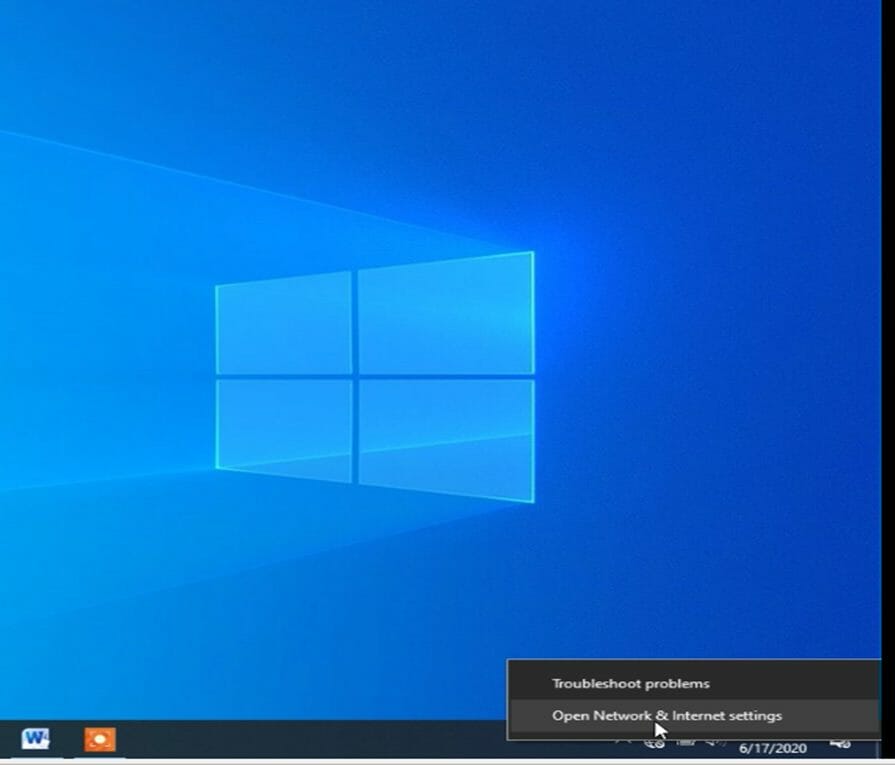
- From the bottom right (System tray), Right Click on the Network Icon and click on Network and Sharing Center.
If You don’t find the icon at the System Tray, there are other methods to reach an Adapter setting.
2. The second method is just Right-click to Network Icon at Desktop and Go to Properties.
3. The second method is you may type <ncpa.cpl> from the run and hit Enter.
4. You can also access Network and Sharing center from the Control panel> Network and Sharing center.
Once you access the Network Window, follow the following procedure.
The network and Sharing Center will open Like this :-
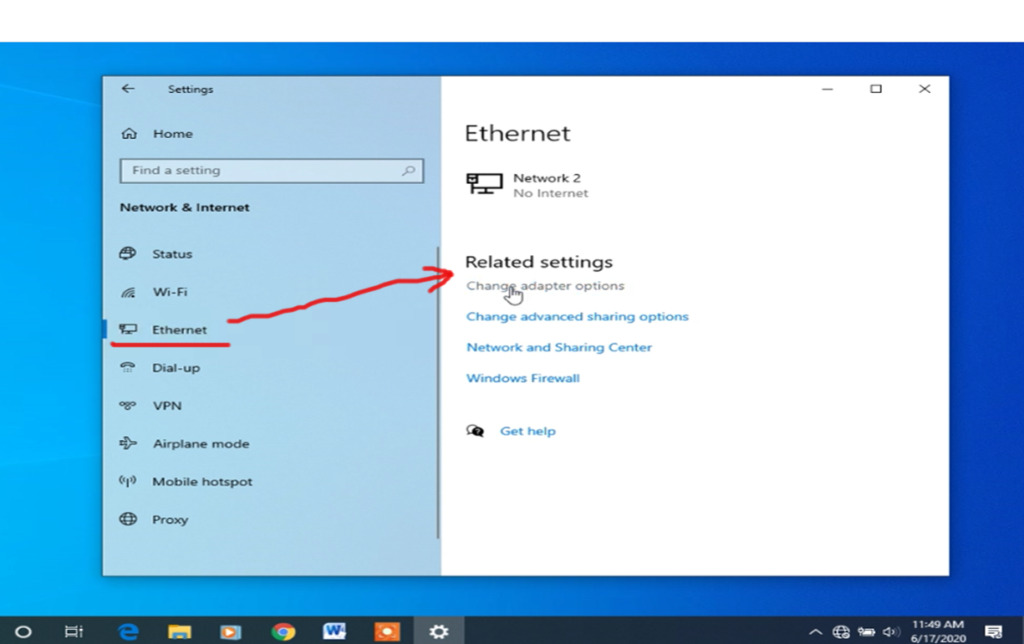
Here, Point Mouse to Ethernet and select Change Adaptor Setting. Now you will see the adapters in Network Connection Window.
There may be only One Ethernet adapter in the case of Desktop, or it may have Ethernet, WiFi, and Bluetooth, as shown in Figure.
Adapters that have no connectivity will have a Red Cross mark, you may note it in the following Picture.
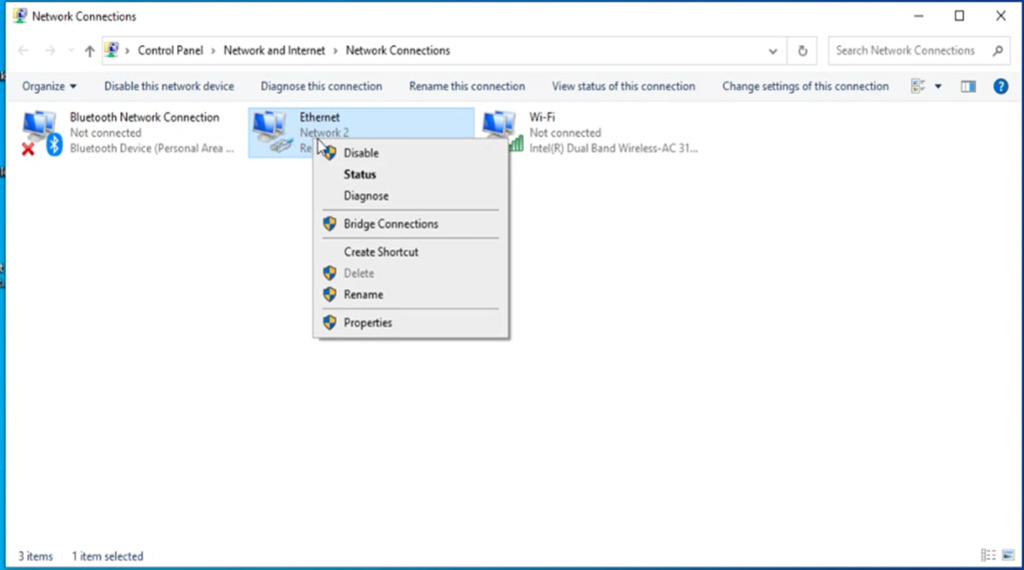
Now Right Click on The adapter where you want to Set the IP address manually. Go to the properties now Ethernet Properties Windows will open as follows:-
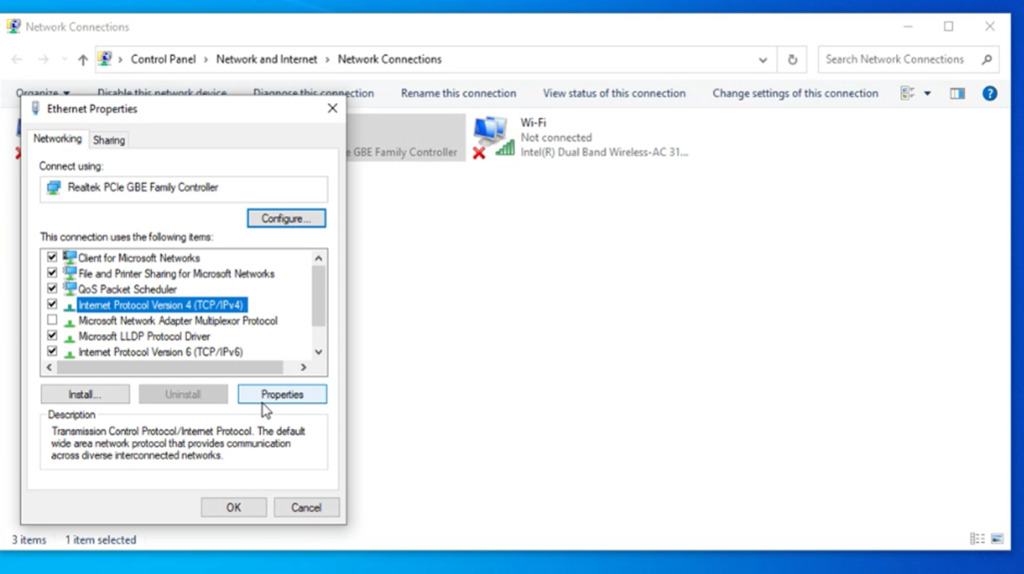
Here Select Internet Protocol Version 4(TCP/IP) and click in Properties as shown in the above figure.
Now you will get Internet Protocol Version 4(TCP/IP) Properties window where you can set the IP address Manually.
The plethora of different fields in IP address
In this wizard, you can see 5 blank fields, that are: IP address, Subnet Mask, Default Gateway, Primary DNS, and Secondary DNS.
To know more about IP address, read IP address version 4, Classless IP, and IPv6.
IP address
The IP address is the unique 32-bit address provided to your PC. It’s like the name given to a person in a house. As the name of a person, it should also be unique and assigned to only one PC in a network. It looks like 192.168.1.5, four octets separated by a dot; each octet has decimal value 0 to 255.
Subnet mask
The subnet mask for the classful IP address will be assigned automatically by the computer. If you are using the classless IP, you have to provide a custom subnet mask. The above link of Classless IP address has details of the subnet mask.
Default Gateway
Default Gateway is the address of Router in Your network. In the case of home Internet, its the IP address of your Modem. The gateway IP will be in the same network as your PC. Most probably, the value of the last octet is 1. Suppose your PC has IP 192.168.1.5, then the gateway should be 192.168.1.1 in most of the cases.
DNS server
Primary DNS is either provided by your ISP. Or it is the same as the IP address of the ADSL Modem, which is the same as the default gateway. The DNS server resolves the domain name to the IP address.
Secondary DNS is needed when Primary DNS fails to resolve the request. It is also provided by the ISP, or you may use universal DNS addresses like 8.8.8.8, or 8.8.4.4, etc.
Once You feed all the fields, You can Click OK as in following image .

Now, if you want to check the IP address, Right-click on the adapter. Then, go to Status. When the status window opens, click on “Details” to see the IP.
Here you can verify the IP address, subnet mask, and default gateway. The default gateway must be in the same network segment with the assigned IP. DNS server may be IP of the gateway itself or as provided by ISP. ISP also provides the alternate DNS IP. If not, you may assign global DNS like 8.8.8.8, or 8.8.4.4 on the Internet. In other private networks, the DNS servers are locally defined.
Check the IP connectivity
To check the connectivity, ping the gateway address from Run Command. Just Press Windows Logo+ R , type <ping 192.168.1.1>. The given IP is just for an example, different networks may have a different IP address of the gateway. If you get a response from your gateway, then it should work fine. To know more about ping command, read this post on Ping commands.
You can assign manual IP to any adapter in the same way. In case you have a WiFi adapter or Multiple Ethernet adapters. The process of assigning IP Addresses is the same.
Please share this article if you find it worth sharing.


What’s up Dear, are you truly visiting this site daily,
if so after that you will absolutely obtain nice know-how.
I always emailed this weblog post page to all my contacts, for the reason that if like
to read it afterward my links will too.
Great post. I used to be checking constantly this blog and I am impressed!
Extremely helpful information specifically the ultimate phase 🙂 I handle such info a lot.
I used to be seeking this particular info for a very lengthy time.
Thanks and best of luck.
Very nice article, exactly wһat I ѡanted to find.