Access the Cisco device through Console. In this topic, I will demonstrate the methods to access the cisco device via RS232 Interface known as a console port. I will show every step with the screenshots and descriptions of every command. Hope at the end of the topic you will be able to understand how to access Cisco device through Console and Telnet Interfaces.
We shall discuss the cisco device in some other tutorial. Here, I assume you know the basics. There are many cisco devices like Switch, Router, ASA Firewall, etc. Here, we are focussing on the Cisco Router. The basic is the same in every device, though there may be a little difference in accessing them.
As I have already said in my previous post, the Router is a piece of hardware that needs to be configured before putting it into use. To configure it, you have to access the Router console of course. There are various methods for accessing it, but for the first time, you must have to log in using the console port.
Various ports for Router access
You can access Router for configuration via:-
- Console Port: Generally an RJ-45 port connector for connecting with PC COM port with a console cable.
- Auxiliary (Aux) port: This is a port for accessing Router from remote with a modem connection. Its a non-IP interface like a console port.
- Telnet: You can access Router via Telnet maximum of 5 clients from any computer connected to the Network. Though the username and password are sent un-encrypted.
- SSH (Secure Shell): IP based secure connection from PC in Network. Or you may say it is Telnet with added encryption.
You cannot use Telnet or SSH unless you configure the device since there is no IP address assigned to the interface. The IP Interfaces are Fast Ethernet, Gigabit Ethernet, Serial port (Don’t get confused with the console port, this is IP based port to connect Router to another Router or Modem), etc. For the first time, you have to connect with the Console port or the Aux port to configure the IP interfaces.
How to Access the Cisco device with Console port
Console a serial port based on the RS-232 standard. It is connected to the PC with its COM port. COM port in a PC is a 9 pin female port. You will find it in most of the PC with the name COM1. You can check it in Device manager, whether it is there in your PC or not. On laptops, you do not generally find those ports nowadays. However, you may opt for a USB to serial adapter which converts your USB port into COM port.
The adapter converts USB to virtual COM port which may have serial numbers COM1 to COM4. It is important to know the COM port number for a successful connection. So note it down after adding hardware if it is not in your PC by default. The console cable is a rollover cable, with one end 9 pins “D” male connector for PC side and another end is either a 9 pin or an RJ-45 connector. That depends on the Router Make and model, it’s generally RJ-45 nowadays though.
So, Console cable is a rollover cable with one end 9 pin D connector and other end RJ-45 connector. You have to connect this cable to the PC COM port and Router Console port.
Connection in Packet Tracer
In the packet tracer, from the bottom left pane, you can select the devices and put them in the middle workspace. There are so many options for the devices, I will show you a few of them. There is a device menu at the left and the available variants of that device at the right. You choose Router from left Menu, all the available router models will show up. Similar to the other devices like a switch, connections (for cabling), End device( For host PC).

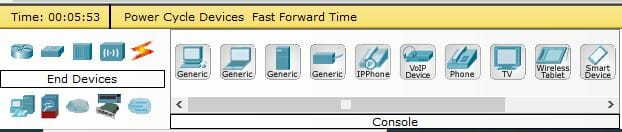

For every main device selected from left, you will get a range of such devices to choose from.
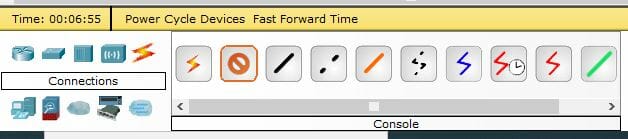
Here We take a router, I choose the 2901 model, it has two Gigabit Ethernet ports, that are sufficient for me right now. A generic PC and console cable from the connection section. Let’s get them connected.
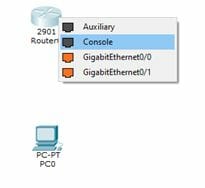
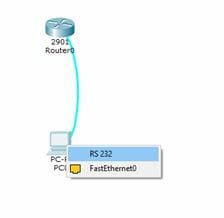
Place two devices in the workspace, Select console cable from the cable menu and right-click on Router. The available ports are 1 Auxiliary, 1 console, and 2 Gigabit Ethernet. Remember the names of the port 0/0 & 0/1. You have to address them by this name while configuring them.
Select the console port, as you are connecting console cable. Then drag the cable to PC, and right-click. You will get 2 options there, Fast Ethernet and RS 232. You must have understood till now that we are going to join it to the RS 232 interface.
Accessing Router through PC terminal
The physical connection for the console is done now. Next, you have to access the router from the PC. We will go to the terminal of PC, like hyper terminal used in Windows XP flavor. Windows has discontinued that software. SO, you may go to Putty. It is easily available for free download. Putty is the emulator application that runs on any platform with all the possible connection methods. You can use serial, telnet, and SSH connection in the putty application.
Here, we will connect with the help of the terminal that is built-in feature in Packet tracer.
PC Side setting in Packet Tracer
Double click on PC to see all the PC properties. The window will look like this.
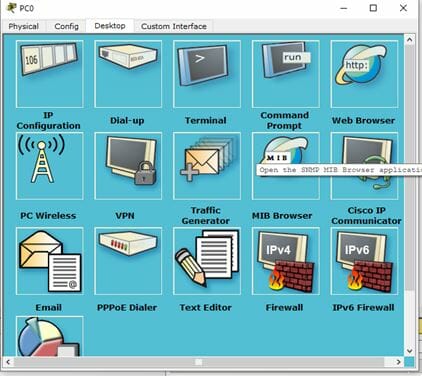
The third tab in the PC properties explorer is Desktop. In the Desktop window, you can see the Terminal at the third position from the top left. Click on that terminal to connect the PC to the router console. You will get the following connection parameters, keep it at default values to connect the PC with the router.
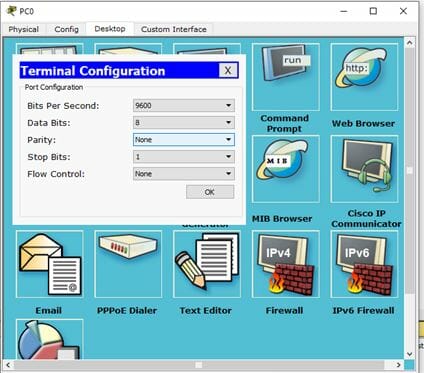
The default values of serial connection are speed- 9600 bps, 8 data bits with one stop bit, no parity, and no flow control. If you don’t have any idea, just forget it and let it be at default values. The same parameters are applicable when you are connecting a real router via Putty.
On a successful connection, you will get the following screen of Router console.
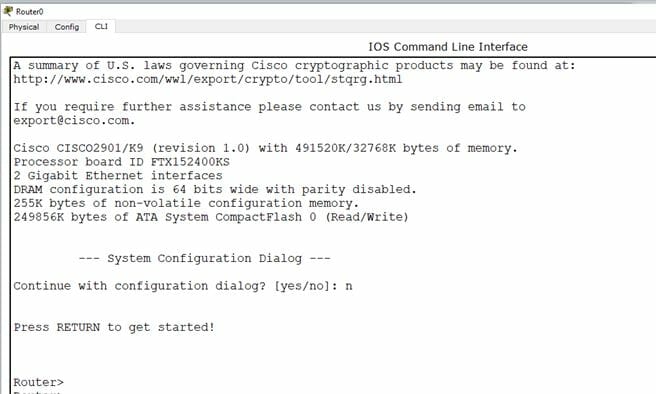
You can see the Router console here in the picture. The CLI tab shown in the image is exactly the same as accessing a live router. The top few lines show the License, version, hardware & software info, etc.
The system does not find a valid start-up configuration file, hence prompting for entering configuration dialogue. Press N and proceed, the router will come in User Exec Mode with a default host-name Router followed by “>” sign.
So far, we have successfully connected the router from console port. For further mode of connections read the posts on how to connect the router with Telnet and how to access devices with SSH.
Hope it may help you to understand the concept of how to access cisco device through the Console port. Accessing switch is exactly similar to this.