SSH(Secure Shell) is a secure way to access the Network Devices. SSH provides secure access to the network device, unlike Telnet. It is encrypted to provide security whereas the Telnet sends un-encrypted data over the Network. Both SSH and Telnet uses the VTY lines for accessing the devices like Router and Switch.
In the last post, I explained the connection method using Telnet. Here I will illustrate the SSH connection using Packet tracer to access a Cisco Router and a switch. I will explain it step by step with the screenshots. Let’s first have a look at what exactly is SSH.
Secure access to Network Devices: Why SSH?
Secure Shell is a protocol which allows a host to connect securely to the Server, Network Device, or a Remote host. It provides a text-based interface to communicate. Since the SSH is an encrypted method, it is preferred over the telnet for accessing the Network Devices.
SSH has two versions- SSH-1 & SSH-2. It uses TCP well-known port 22. It provides encryption to maintain the confidentiality and integrity of data. The username & password are prone to the man-in-the-middle-attack in an older protocol like telnet. So, SSH is a secure and better alternative to Telnet.
Like Telnet, it will also use the VTY line to access a router or a network switch. VTY lines can be configured up to 16 simultaneous connections. Though it is recommended not to allow all those connections unless it is required.
How to set up SSH connection in a Cisco Router
Let us see how to set up Secure access to Network device with SSH. We are taking a simple topology, a router connected to a host using cross UTP cable. Let us see the summary of the steps first.

- Assign hostname to the router
- Assign a domain name
- create user and password
- Interface configuration
- Set enable password/secret
- Configure Crypto Key
- Configure line VTY
- Define SSH version
- Assign an IP address to the client
- Connect using Command prompt
From the Global Config mode type the following commands one by one.
Assign Hostname to the Router:
Router(config)#hostname NetworkHopeAssign a Domain Name:
NetworkHope(config)#ip domain name hopeCreate user and password
NetworkHope(config)#username admin password p@ssw0rdInterface configuration
NetworkHope(config)#interface g0/0
NetworkHope(config-if)#ip address 192.168.1.1 255.255.255.0
NetworkHope(config-if)#no shut
NetworkHope(config-if)#exit
Set enable password/secret: You may set either enable password or secret .
NetworkHope(config)#enable password p@ssw0rdConfigure Crypto Key: Generate rsa key of 1024 bits. The name of the key will be host_name.domain_name. Provide the no of bits between 360 to 2048 when asked “How many bits in this module:” Here I choose a 1024 bit encryption key.
NetworkHope(config)#crypto key generate rsa

The name for the keys will be: NetworkHope.hope
Choose the size of the key modulus in the range of 360 to 2048 for your
  General Purpose Keys. Choosing a key modulus greater than 512 may take
  a few minutes.

How many bits in the modulus [512]: 1024

% Generating 1024 bit RSA keys, keys will be non-exportable...[OK]
Configure line VTY:You may choose line VTY 0 15, I opted here line VTY 0 4. Ensure a space between the digits.
NetworkHope(config)#line vty 0 4
NetworkHope(config-line)#transport input ssh
NetworkHope(config-line)#login local
Define SSH version
NetworkHope(config)#ip ssh ver 2Assign IP address to client : Assign IP address 192.168.1.2/24 to the host.
Connect using Command prompt: Type the following command from host PC command prompt to connect. The switch -l specifies log in with the mentioned user. As we have defined “login local”, you should use a specific username to log in.
PC>ssh -l admin 192.168.1.1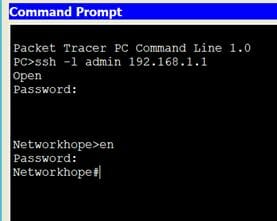
The image shows the logged-in status of the host with SSH. Setting the enable password is necessary. Without the enable password you will not be able to enter privilege mode like it was in Telnet.
SSH connection in a Switch
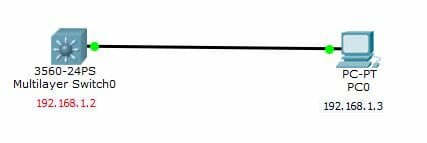
The following topology is used to connect the PC and the Switch. For the configuration of the switch for SSH, everything is the same as above. I just have changed the IP address for differentiation.
The only difference is in Interface configuration. In a router, the IP address was assigned to the physical interface Gigabit Ethernet 0/0. Here the Interface is a virtual interface.
The IP address should be assigned to the VLAN in a switch. As we are not creating any VLAN here, assign the IP to the default VLAN that is VLAN 1.
NetworkHope(config)#interface vlan 1
NetworkHope(config-if)#ip address 192.168.1.2 255.255.255.0
NetworkHope(config-if)#no shut
NetworkHope(config-if)#exit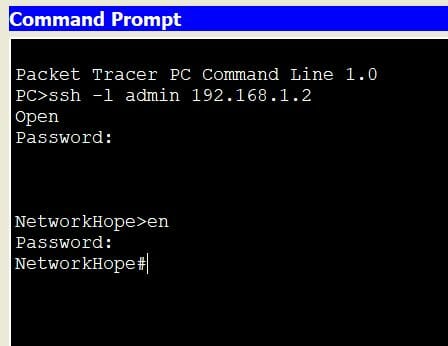
The connection status of the switch is as shown in the above figure. Note that the device is available at 192.168.1.2 here.
You can refer to my previous posts for Accessing the devices with console port and accessing the device with Telnet command.
Click here to Read about Password Recovery in Cisco Router.
If you find it informative, please don’t forget to share it with your friends.