
Connect the router through Telnet
To Access router from the telnet , you have to configure VTY lines. First, let’s find out why you need to access the router through Telnet . Then we will find out how to connect the router through Telnet.
In the previews post, we learned to connect it through the Console port, which is essential. As a new router cannot be connected through Telnet or SSH. But once you access it through the Console, you may configure it for Telnet or SSH. Since the console cable is a few meter cable, generally not more than 5 meters though a maximum 15 meter is the permissible length in RS 232 standard.
Every time, you need to access the router, you should physically be close enough to the router. That does not look very much convenient. Once you configure the Interfaces of the router, you can access it from the network with the IP address and credentials of course. Both Telnet and SSH works on an IP interface.
What is a VTY line
Telnet works through the VTY (Virtual teletype) interface, which is a virtual interface and allows a maximum of 16 devices at a time to connect. Since it is a virtual interface, you can connect via any physical interface. Means, either you are connected with Gigabit Ethernet 0/0, 0/1, or any other interface, as long as you can ping your gateway (Router interface), you can access it through VTY lines.
The 16 lines of VTY are addressed as 0 to 15. So, an address like “line vty 0 4”, means you are using 5 of them. You have to configure the line for allowing login and also you have to set a password before allowing login. That is mandatory. Besides, you also have to set a password (or Secret) for Enable. For SSH you need to define more parameters, that I am showing you in this post.
As you are going to access the router through the IP interface, you must configure an interface to allow the PC to communicate the router through it.
To access telnet from PC, you can use command prompt with a syntax “Telnet 192.168.1.1”. Here 192.168.1.1 is an example of IP that is assigned to the router interface. You can do Telnet from Putty also. One more thing is that Windows PC does not recognize the Telnet command by default. The command prompt may return with the message “Telnet is not recognized as the internal or external command”. All you need to install it from Control panel, Add/remove software wizard, Add/remove windows features option. Like you do it for FTP, IIS, etc. If you are not aware of how to do it simply go for putty, you don’t need the command prompt then.
Either connect from Command prompt with telnet command or do it from the putty application, the choice is yours.
We are going to use basic router commands, I am explaining them in the table of commands below.
So, now let’s go for enabling Telnet and see how does it connect.
Configure router for Telnet
Router>en
Router#config t

Enter configuration commands, one per line.  End with CNTL/Z.

Router(config)#hostname NetworkHope
NetworkHope(config)#enable password p@ssw0rd
NetworkHope(config)#line vty 0 4
NetworkHope(config-line)#password p@ssw0rd
NetworkHope(config-line)#login
NetworkHope(config-line)#exit
NetworkHope(config)#Interface gigabitethernet 0/0
NetworkHope(config-if)#ip address 192.168.1.1 255.255.255.0
NetworkHope(config-if)#no shut

%LINK-5-CHANGED: Interface GigabitEthernet0/0, changed state to up

NetworkHope(config-if)#exit
NetworkHope(config)#exit
NetworkHope#wr mem
Building configuration...
[OK]
| COMMAND | MEANING |
| en | Enable command: to enter privilege configuration mode |
| config t | Configuration terminal: Enter global configuration mode |
| hostname | Set router hostname |
| enable password | To set the password for enable command |
| line vty | Enter Line configuration mode. Here 0 4 is the number of VTY lines. 5 numbers of allowed VTY lines are there. |
| password | set a password for the LINE VTY login |
| login | allow login with a valid password |
| interface | Enter the interface config mode. Provide valid interface name like interface GigabitEthernet0/0 or G0/0 simply. |
| ip address | ip add <IP> <Subnet Mask> . Assign an IP address to the Interface |
| no shut | no shutdown. Set the IP interface (G0/0) to no shut state or switch it ON. |
| wr mem | Write Memory: To save from Running Config to Start-up config. |
Click here to read more about Password Recovery.
Topology
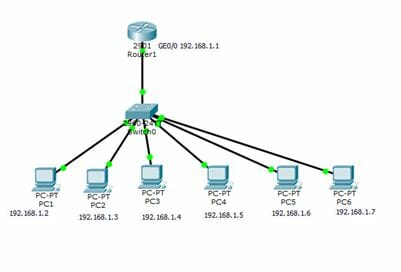
- The router is connected to a Switch through the G0/0 interface.
- The IP of interface is 192.168.1.1.
- Six PCs are connected to the switch and IP assigned to PCs are 192.168.1.2 to 192.168.1.7 as shown.
- Gateway IP address of each PC is 192.168.1.1.
- Cable is straight UTP.
PC Configuration
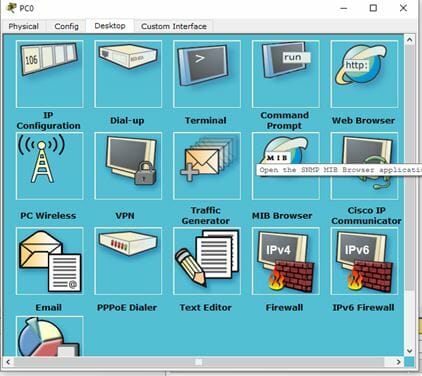
Assign an IP address to each PC as shown in the following image. Double-click on the PC to open the config window. Go to the third tab, i.e. Desktop. Open IP configuration from the top row left.
Now provide the IP address, Subnet Mask, and Gateway as shown in the following image.
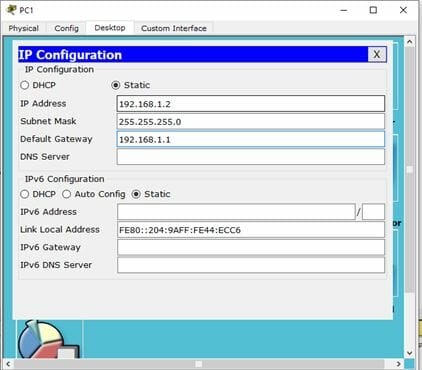
Similarly, apply the IP address to all PCs. After applying IP you may ping the gateway from each PC using Command Prompt. All PC should be able to ping the Gateway IP, i.e. router interface G0/0.
Remember, if you don’t use the Switch in between Router and the host, the cable should be cross UTP cable.
Access Telnet from PC
To access the router in telnet from the PC, you should remember the password applied for Line VTY connection. Once you log in to the Router you will need the enable password to go to the privilege mode. For Telnet to work, the enable password/secret must be assigned, otherwise, your telnet connection will be refused.
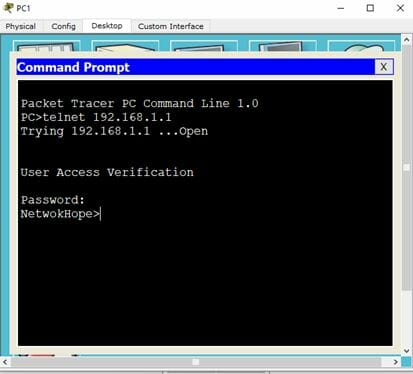
Now we are all set to access the router from Telnet. Go to the PC command prompt as earlier. In the command prompt, type:
telnet 192.168.1.1
The router will prompt for the password to log in. Enter the password, the router console will open. Type “en” to enter Privilege Exec mode. Again type the enable password when prompted. I hope it is clear from the image below.
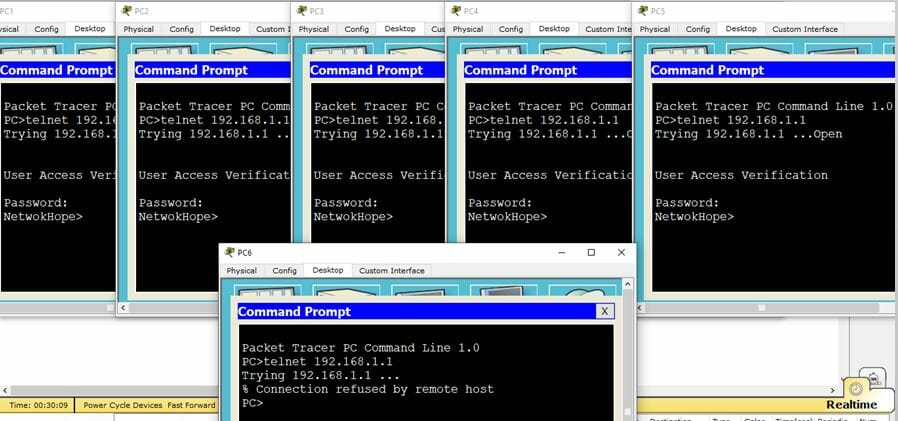
If I try to connect all the PC’s in the same manner. Guess what happens then?
As I have defined the Line VTY 0 4, only 5 hosts will get connected. We have 6 hosts in the topology. So, the last host will get an error message of refused connection. See the image below..
It should be understood though, I have connected all the Host PCs in the same interface i.e. G0/0. If the router has other functional ports with another IP address, the host connected to that segment may also access the telnet, provided the total number of the host does not exceed 5. They will have a different IP range. Since it is a virtual port, the user may connect to any physical interface of the router.
Telnet connection in a Switch
In the given topology, you can also configure the switch for the telnet access. The command used for the router is applicable to the switch. The only difference is in the interface configuration.
In a router, the IP address was assigned to the physical interface Gigabit Ethernet 0/0. Here the Interface is a virtual interface, i.e., VLAN.
The IP address should be assigned to the VLAN in a switch. As we are not creating any VLAN here, assign the IP to the default VLAN that is VLAN 1.
Replace the lines in Router configuration as done above –
NetworkHope(config)#Interface gigabitethernet 0/0
NetworkHope(config-if)#ip address 192.168.1.1 255.255.255.0
NetworkHope(config-if)#no shut
– with the following lines.
NetworkHope1(config)#interface vlan 1
NetworkHope1(config-if)#ip address 192.168.1.50 255.255.255.0
NetworkHope1(config-if)#no shut
NetworkHope1(config-if)#exit
Keeping the rest configuration same, you can access the switch in IP address 192.168.1.50 using Telnet command or from the Putty software.
Here the topic access router via Telnet is finished. The next part is accessing the router through SSH. Wait for my next post on how to access the router through SSH (Secure Shell).
If you find it informative, share it with your colleagues from the share button below.


How can I crack the password if I forgot the password of the router
I am always thought about this, appreciate it for putting up.